What is OBS?
OBS Studio (Open Broadcaster Software Studio) is a free, open source application that allows users to switch between various digital inputs – webcams, tablets, browser windows, documents, videos, etc. – on their computer and feed them all as a single stream to Zoom. It eliminates the need to share your screens and windows in Zoom thereby eliminating those awkward transitions from one Zoom view to another. Zoom “sees” the output of OBS as a webcam, while you control the changing/mixing of inputs using OBS.
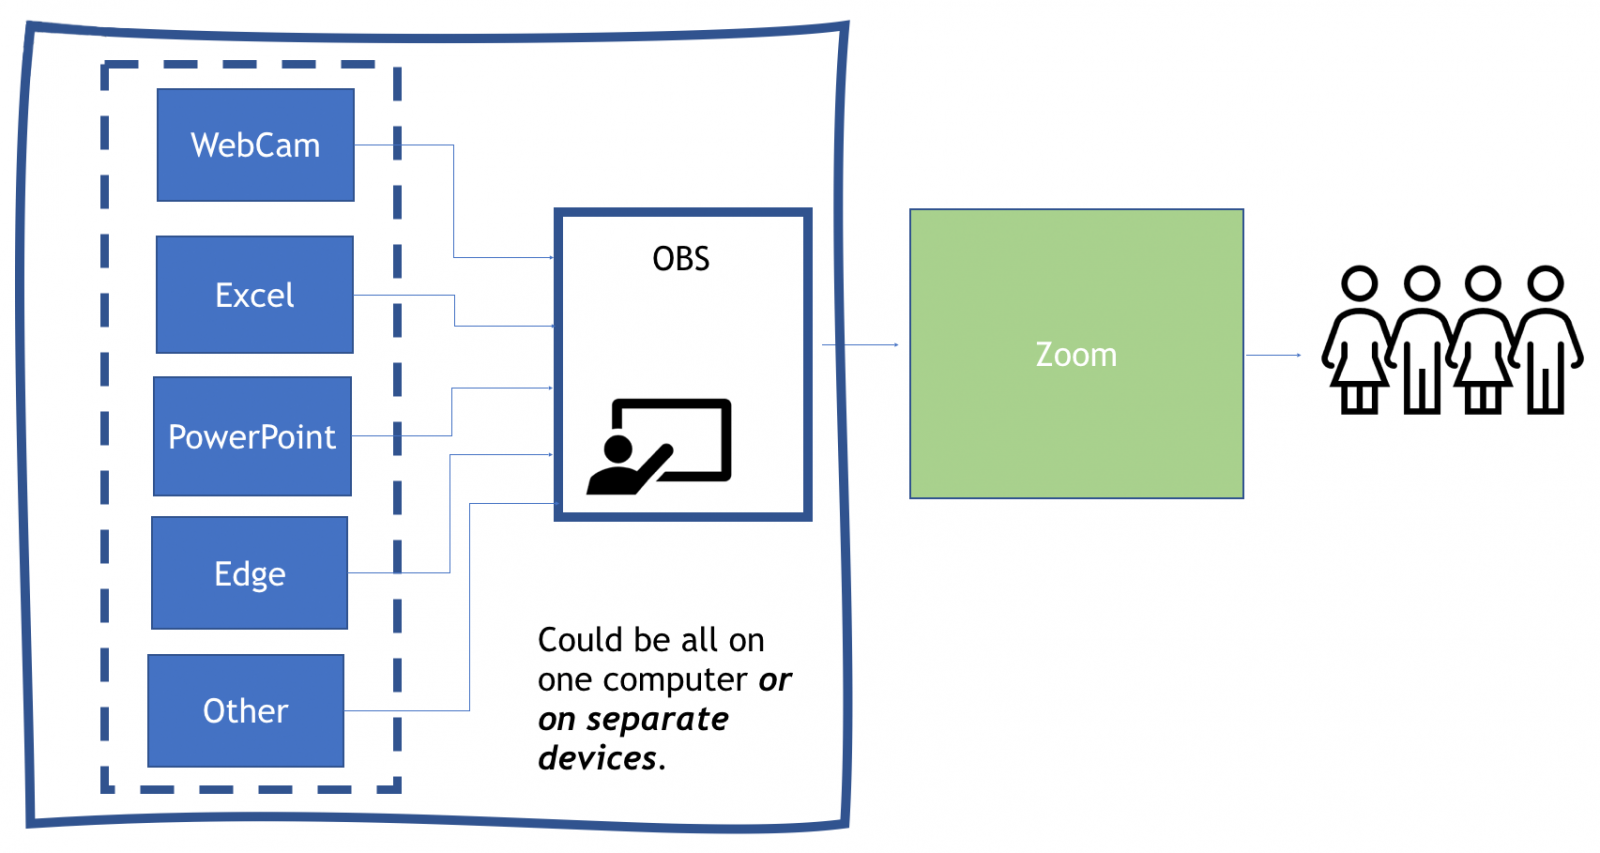
OBS allows users to seamlessly switch between various digital inputs while sending a single stream to students via Zoom.
Produced using the methods described in our “How to Use OBS and Zoom for Online Teaching” guide, the video below showcases what can be done with OBS – hosted by CRDT Multimedia Producer Greg MacDonald:
Our Guide
You may already be using Zoom, but finding the transitions between class materials via screen sharing are just too clunky. Or you may be fairly new to Zoom, and though you’ve traditionally incorporated various source materials into your teaching, haven’t found a way to really replicate the experience for students virtually. Or you’re simply curious about expanding your tech skills for teaching. Whatever the case, our guide is for anyone who wants to deliver a remote education experience that seamlessly incorporates presentations, spreadsheets, documents, websites, video, a virtual blackboard – really anything digital – without skipping a beat. Even if one’s first attempts at using OBS with Zoom are a little bumpy, we’ve found that students really appreciate the effort.
We understand that the software may appear somewhat daunting at first – it did to us – but we also know from experience that taking the time to learn a few basic concepts and with some practice, you can quickly tame the learning curve.
Our goal is to provide enough information to get educators comfortable and up and running as quickly as possible with OBS and Zoom, and our “How to Use OBS and Zoom for Online Teaching” guide overs:
-
What hardware you need, along with some “nice-to-have” recommendations;
-
The software you’ll need and how to install it;
-
A comprehensive How to Guide that covers everything you need to know to create, organize, and present your class materials with OBS, including:
-
A downloadable profile with all of the OBS settings you need to get started with Zoom;
-
An overview of the basic building blocks of OBS: Scenes and Sources;
-
A practical workflow for quickly sizing your materials for maximum visibility and legibility;
-
How to program and use keyboard shortcuts (aka Hotkeys) for efficient switching;
-
A series of step-by-step recipes to create content based on what it is you want to show;
-
A practical method for getting your first class organized and set up;
-
Productivity tips to then quickly scale everything up to create an entire course;
-
How to go live – from organizing your displays and screens and reactivating your Sources to switching with transitions;
-
Downloadable Yale-branded custom transitions;
-
How to archive your classes and recall them later.
-
-
Tips we’ve learned from experience – troubleshooting (no software is perfect!) and otherwise;
-
Resources we’ve found useful;
-
And did we mention the series of videos covering many of the steps and sections?
A Note from Rick
I was teaching two courses in the Spring of 2020 when Yale College went to online instruction. That was a bit of a jolt, especially since both courses reflected my increasing use of several types of media in class sessions: chalk board, PowerPoint, Excel spreadsheet, a pdf viewer and a browser. Not every one of these is used in every class session, but almost all class sessions use at least two and typically three sources.
In my usual teaching environment, Evans Hall on the Yale campus, this use of many different media is easy to pull off. Each classroom has at least three screens and a podium computer capable of sending two different displays to two different screens. Further, it is easy to hook up a laptop or other device and have three different sources up on three different screens. I often have a PowerPoint that keeps students oriented in the flow of the class, a set of financial statements being analyzed, and an Excel workbook in which to do the analysis all up at once.
Zoom is a wonderful platform but handling all the different inputs and switching between them was just too cumbersome and slow. Plus, I wanted a better substitute for the chalkboard than Zoom provided.
My search for a solution led me to OBS. My struggles with getting it set up and with using it efficiently led me to the Yale School of Management Case Research and Development Team, and in particular to Multimedia Producer Greg MacDonald. The team (and Greg) has a lot of experience in putting together online, multimedia cases and other teaching material. I have found our collaboration to be extremely productive on at least four fronts:
- Selecting the right software approach for integrating multimedia;
- Installing this software;
- Identifying, finding and selecting the right combination of settings for the various pieces of software; and,
- Developing a set of habits about file locations, file names, and attention to workflow that greatly increased my productivity.
I hope this document lets you take advantage of some of what Greg and I have learned.
Rick Antle
William S. Beinecke Professor of Accounting
Yale School of Management